
How to Handle JSONata and Data Mapping
Before You Start
Before you start, make sure you've done the following:
- Installed the latest version of Doohickey VSCode Extension
Step-by-Step Guide
Step 1: Plan Out Customer Requirements
The most important part of any integration is spending the time to carefully plan out your customer's requirements. These requirements can include:
- Finding the appropriate source value
- Determining any transformations that need to occur on that value
- Finding the appropriate target value
- Determining the appropriate method for the data flow - should it be on a polling schedule or webhook based?
- Documenting any source fields that will not be mapped to a target
For the purposes of this example, we will map out very simple requirements here, but for your own integrations, consider utilizing Doohickey Design Studio.
Note: The table below has been split into two for space reasons.
| Data Flow | Source Type | Source Field |
|---|---|---|
| Order | REST API | CUSTOMER_ORDER_NUMBER |
| Order | REST API | SHIP_ADDR_1 |
| Order | REST API | SHIP_ADDR_2 |
| Order | REST API | COUNTRY |
| Order | REST API | PURCHASED[] |
| Order | REST API | PURCHASED[].QTY |
| Order | REST API | PURCHASED[].SKU |
| Order | REST API | - |
| Order | REST API | CUSTOMER_CODE |
| Transformation | Target Type | Target Field |
|---|---|---|
| - | REST API | orderNumber |
| Concat SHIP_ADDR_1 and SHIP_ADDR_2 | REST API | shippingAddress |
| Concat SHIP_ADDR_1 and SHIP_ADDR_2 | REST API | shippingAddress |
| Turn 3 digit Country Code to 2 digit (USA -> US) | REST API | country |
| - | REST API | items[] |
| - | REST API | items[].quantity |
| - | REST_API | items[].sku |
| Hardcoded value | REST API | "780" |
| - | REST API | Not Mapped |
Step 2: Create JSON and JSONata files
Prior to moving forward, ensure you are located in your integration project's directory.
First, create an order.json file, copying and pasting the contents below.
{
    "CUSTOMER_ORDER_NUMBER": "PO7355892",
    "SHIP_ADDR_1": "123 Main Street",
    "SHIP_ADDR_2": "Any City, CA 12345",
    "COUNTRY": "USA",
    "CUSTOMER_CODE": "SN84492",
    "PURCHASED": [
        {
            "QTY": "6",
            "SKU": "ABC243"
        },
        {
            "QTY": "1",
            "SKU": "XYZ2345"
        }
    ]
}
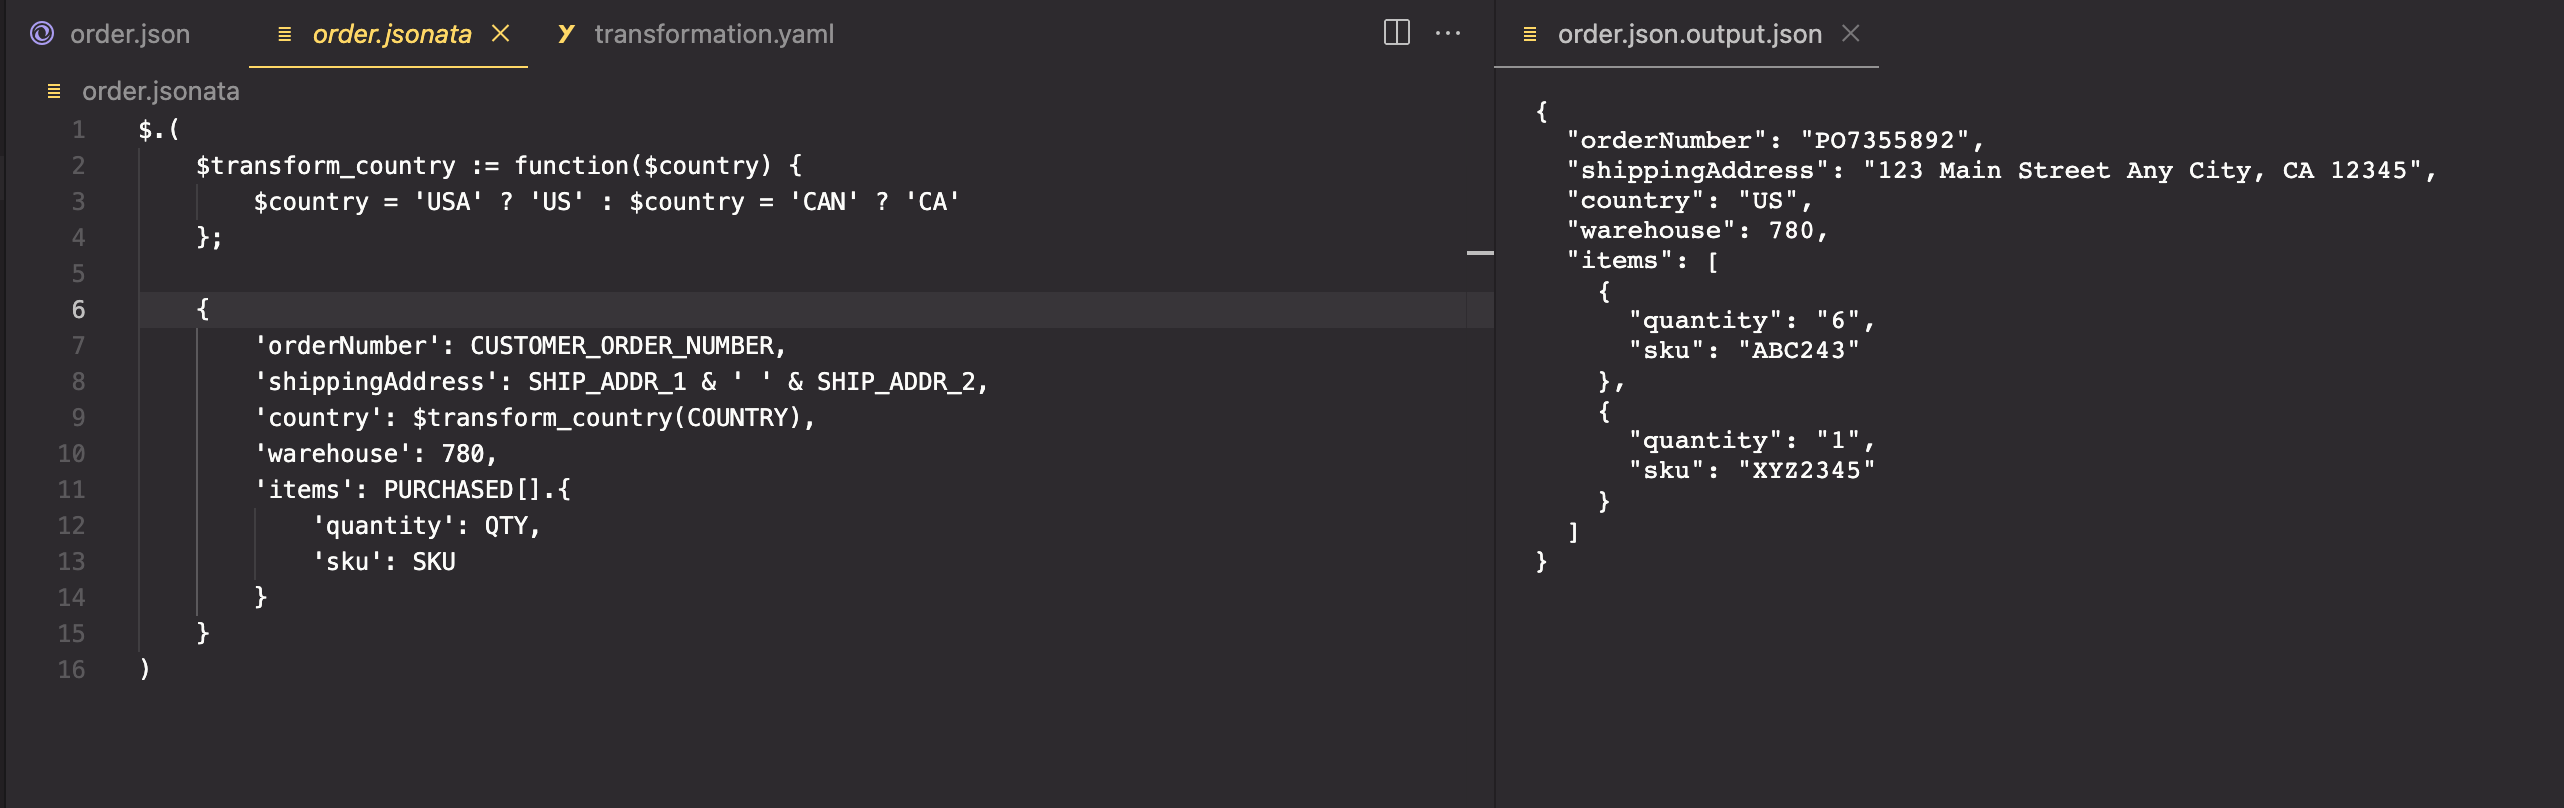
Next, create an order.jsonata file, copying and pasting the contents below.
$.(
    $transform_country := function($country) {
        $country = 'USA' ? 'US' : $country = 'CAN' ? 'CA'
    };

    {
        'orderNumber': CUSTOMER_ORDER_NUMBER,
        'shippingAddress': SHIP_ADDR_1 & ' ' & SHIP_ADDR_2,
        'country': $transform_country(COUNTRY),
        'warehouse': 780,
        'items': PURCHASED[].{
            'quantity': QTY,
            'sku': SKU
        }
    }
)
Step 3: Examining the JSONata File
If you are not familiar with the JSONata query language, we recommend reading through their docs to get a better understanding of the syntax.
The first piece of the JSONata file to review is the transform_country function. Our customer's source country can be either USA or CAN, but the target system expects a 2 digit code - US or CA. This function accepts a 3 digit country - USA or CAN - and returns the corresponding 2 digit country.
    $transform_country := function($country) {
        $country = 'USA' ? 'US' : $country = 'CAN' ? 'CA'
    };
The second piece of the JSONata file is the return object which contains the bulk of our data mapping. Our source fields - from the JSON file, which represents our source API - are mapped to their target fields as defined in our customer requirements.
    {
        'orderNumber': CUSTOMER_ORDER_NUMBER,
        'shippingAddress': SHIP_ADDR_1 & ' ' & SHIP_ADDR_2,
        'country': $transform_country(COUNTRY),
        'warehouse': 780,
        'items': PURCHASED[].{
            'quantity': QTY,
            'sku': SKU
        }
    }
Step 4: Create transformation.yaml
Now that we have our source JSON and our JSONata expression finished, we are ready to preview them using the Doohickey VSCode Extension. In order to use the extension, we first need to create a transformation.yaml file. This file is the source of truth for the extension.
Create a transformation.yaml file in the root of your integration project directory and paste the contents below.
Note: Ensure that the two relative file paths, /order.json and /order match what you have in your integration project directory.
dataMaps:
  /order.jsonata:
    input: json
    output: json
    jsonataVersion: "1.8.5"
    files:
      - >-
        /order.json
To learn more about the transformation.yaml, see the Doohickey VSCode Extension docs
Step 5: Preview Your JSONata Output
Once you have successfully created your transformation.yaml, open the order.jsonata file in VSCode. After the file is opened, you can either right click on the file and select Command Palette or use the keyboard shortcut ⇧⌘P on MacOS or Ctrl⇧P on Windows or Linux.
When the command palette is opened, select JSON: Preview JSONata Output from the list.
If everything was saved and formatted properly, you should see the JSONata output open in a separate VSCode tab.
You have now created your first successful JSONata data map.